Tuesday, August 27, 2013

Trim Healthy Mama Tuesday - Cinnamon Rolls (E)

Last week for Trim Healthy Mama Tuesday I shared my Refrigerator Rye Bread recipe. In that recipe my jar wasn't big enough for all the dough, so I would put a little bit aside in another container. It wasn't a big enough amount to make a 2lb loaf so I had to find another use for it.

One of our favorite treats before we started Trim Healthy Mama was Cinnamon Rolls. I had an amazing recipe for this, but it seriously broke all the Trim Healthy Mama rules. It was delicious, but it also had almost a lb of butter between the bread, the filling and the frosting. So I decided to experiment with my rye bread dough to see if I could make something that would taste as good as traditional Cinnamon Rolls. This recipe is the result.

You will need:

1 grapefruit size piece of Refrigerator Rye Bread ( or you could use Gwen's Easy Bread Recipe if you prefer a white bread.)
Ground Cinnamon
Sweetener ( I use Kal Pure Stevia Extract Powder)
Greaseproof paper


Place the dough on a lightly floured or greased piece of greaseproof paper

With wet hands flatten out the dough
Add a light dusting of Stevia pure extract powder evenly over the dough

Sprinkle the dough with ground cinnamon

Starting at the wide end nearest you begin rolling the dough

My dough got stuck a little so I helped it roll with a spatula

Cut into 2inch slices and arrange on a lightly greased baking sheet

Allow to rise before baking at 450f for about 15 min

Cool on a wire rack

Cover with a low fat cream cheese frosting*

It won't have the usual visual swirl, but it tastes just as good
*Low fat cream cheese frosting
1 tablespoon low fat cream cheese
3 tablespoons of 0% Greek yogurt
dash of vanilla
pinch of Stevia pure extract powder
Mix everything together until smooth, then use to top the still warm Cinnamon Rolls

This post is shared on the Trim Healthy Tuesday link up over at Stacy Makes Cents, where you can find other wonderful Trim Healthy Mama recipes shared by some wonderfully creative ladies.

For more information about Trim Healthy Mama visit their website here.

Monday, August 26, 2013

Marriage Mondays - Our journey to matrimony -part 1

Tomorrow is our 6th wedding anniversary. In honor of that wonderful day I have decided to dedicate the last Monday of every month to a post about marriage.

To start I want to share our journey to becoming husband and wife. We are far from a typical love story, but I think we have an amazing journey that has helped us form a solid and lasting marriage.

How we met:


It was just before my final semester at Bible College. I worked on site and over the summer break we were hosting a youth camp for the fellowship of Pastor's who also ran the college. One of the Pastor's had arranged with two of his supporting Churches to have teams of people come and help us with setting up for camp and then for taking everything back down again after camp. While these teams of volunteers were staying at the college to help us I would be cooking for them.

I cannot count the number of times I had heard the "maybe you'll meet your husband" comments. It started when I made the decision to go to Bible College as a mature student. (I was 30 a few weeks before I started.) We were a tiny facility that definitely didn't have many opportunities for meeting potential future spouses, which I knew when I picked that college. I wasn't going to Bible College to find a husband. I was going to Bible College to study God's Word. There were times when I wanted to scream at the "meet your husband" comments. Now don't get me wrong I had always had the desire to be a wife and a mother. And I wanted to get married if that was the Lord's will for my life. But I also didn't want to marry just any man. So it wasn't really a surprise when the comments started about "meeting your future husband" through one of the two groups of volunteers. Both groups were coming from America. And I had no desire to marry an American. Truth be told marrying an American man was right at the bottom of my list.

The South Florida Church Group with a few of us locals
 Then the first group of volunteers arrived. They came from a Church in South Florida. The group was about half younger adults, who were going out the two local Churches to help run Holiday Bible Clubs for children for the week. The other half of the group were older adults who had come to help us build bunk beds and complete some renovation work to get us ready to host the youth camp. Rob was part of the construction group. They arrived Saturday evening. By Sunday afternoon I was being told by numerous people that Rob was single and I should get to know him. I avoided him instead.

On Monday morning I was up and down in the kitchen by 5am to get the ovens warmed up and the coffee started before I could begin preparing breakfast. After switching on the ovens I headed to the dining room to start making coffee. It was my routine to make the coffee and then sit down with a mug of it and read my Bible while it was still quiet and nobody else was awake. Only when I got to the dining room the coffee was ready and waiting for me. So I poured myself a mug and sat at one of the tables to read my Bible. About ten minutes later Rob walked in, poured a mug of coffee for himself, then came over and introduced himself before sitting down. We chatted for about fifteen minutes before I had to get back to the kitchen to get started on breakfast.

After breakfast he helped with some of the clean up. Then when I sat out some fresh baked chocolate chip cookies with fresh coffee for the construction crew to have a break in the middle of the morning Rob came over and chatted with me again. At lunch he came and sat beside me and the conversation continued where it had finished mid morning. After that whenever he had free time he would find me and chat more. We got on well. He was a genuinely nice guy. More importantly he didn't seem to be disapproving or intimidated of my very strong opinions. He seemed glad of having someone to talk to about more than just trivialities. But neither of us were thinking of anything happening beyond that week.

Rob & I still chatting on the final day, completely unaware this picture was being taken.


We didn't even decide to keep in touch until about five minutes before he left for the airport.


Friday, August 23, 2013

Family fun

This is just a photo post of some pictures of our children having some fun over the last couple of weeks.

Personal Dry Erase Boards with Dry Erase Crayons

Megan is sitting up already, at only 14 weeks

Trying on daddy's glasses

Seth had to try them on too.

Trying to be cool in his sister's sunglasses, while playing with his "Jeff Car"

How to use baby bouncy seats

Perfect for watching a movie

At a neighbors birthday party a couple of weeks ago.

Aiden decided to help Megan play with the floor gym.

Our favorite time of the day, Story Time.

Tuesday, August 20, 2013

Trim Healthy Mama Tuesday - Refrigerator Rye Bread (E)

I remember the first time I tried to make sourdough bread. Serene's sourdough recipe was included in the Above Rubies magazine. It was a lot of a disaster. I was still relatively new to Florida. I was also still struggling to bake successfully with all the "seems so familiar, but not really" ingredients. So I gave up on sourdough.

Fast forward to the end of last year, and the start of my THM journey. Once again it looked like a good idea to try sourdough bread. It was after all one of the only real plan approved breads I could bake myself at home. I had figured out most of those early baking adaptations, so it seemed like a good time to try again. This time I even bought a 25lb sack of rye flour so that I could copy Serene exactly as her recipe was written.

It was a disaster.

The bread wouldn't rise properly. It was like trying to slice cement. Sourdough just wasn't going to work for me.

Then I read about Gwen's easy bread dough, that Pearl had approved as an E bread. It was very similar to a refrigerator bread dough recipe I had that used wholewheat flour.

But I still had most of that 25lb sack of rye flour. Maybe I could convert the recipe I had into a rye bread.

The first time I used a mixture of white bread flour, wholewheat flour and rye flour. It worked really nicely. So I ditched the white bread flour and just used wholewheat and rye. Then I increased the rye content. It was still a really nice bread. So now I'm ready to share the recipe after several successful batches giving me the same tasty result.

Easy Rye Bread (E)

4 cups rye flour
3 3/4 cups wholewheat flour
1/3 cup vital wheat gluten*
2 tablespoons of yeast
1 tablespoon of salt
4 1/2 - 5 cups of hand hot water

* Gluten is added to this recipe to help with a good rise. Whole grain flours have less gluten content than white flour because the bran is taking up some of the volume/weight. If the flour doesn't have a high enough gluten content then the bread won't rise properly and you will be left with a dense bread, no matter how good your yeast is, or how much yeast you use.

Whisk together all the dry ingredients.

Add the dry ingredients to the water in a large bowl or container.

(I use a large glass jar so I can store it in the same container I mix it in. I also found adding the dry ingredients to the water helped me get a better mix, as adding water to the dry ingredients made it difficult to get all the flour mixed in completely.)

Mix it all thoroughly with a wooden spoon until there is no dry flour left.

Cover loosely and leave at room temperature for about 2 hours to prove.

Once the dough has risen well and flattened out a little on the top move to the fridge. Keep it covered loosely to stop it drying out on top, while allowing the gases that form to escape. (Who wants to clean exploding bread dough from the inside of their fridge?)

Leave it in the fridge for at least 24 hours if you want to get rid of the phytates. If you are using it as a THM plan bread leave it in the fridge for a minimum of 3 days to reduce the glycemic index and have a nice fermentation going. It will stay fresh in the fridge for about a week.

My gallon glass jar for mixing and storing my bread dough
Adding the dry ingredients to the water
Mixed thoroughly with a wooden (bamboo) spoon
My jar isn't quite big enough so I put a bit in another tub
After an hour
After 2 hours
The flattened top shows me it is ready for the fridge
To use:

Take the container out of the fridge and immediately remove the amount of dough you want to use. There are 2 methods for this. You can use some extra flour over the dough to stop it from sticking to your hands, or you can make sure you keep your hands nice and wet to stop it from sticking.

Quickly form the bread into the desired shape. (I'm lazy and don't like messing with free forming a loaf, so I use 2lb loaf tins for baking my bread.)

Leave the shaped bread out on the counter for 90 minutes.

If free forming the bread you might want to invest in a bread stone for the oven. If using a bread stone you will need to start the oven 30 minutes before you bake the bread so that the stone has time to get up to the right temperature.

If using loaf tins (like I do) you will only need to heat the oven up about 5 minutes before baking the bread.

Bake at 450f

For 1lb free form loaves it will take about 30-35 minutes to bake.
For 2lb loaf tins it will take 45-50 minutes to bake.

Cool on a wire wrack.

Enjoy one or two slices of this bread as an E, but remember that means less than a teaspoon of butter between the slices if you have butter with it. I really enjoy it with just the Slim Belly Jelly (page 411) on top.


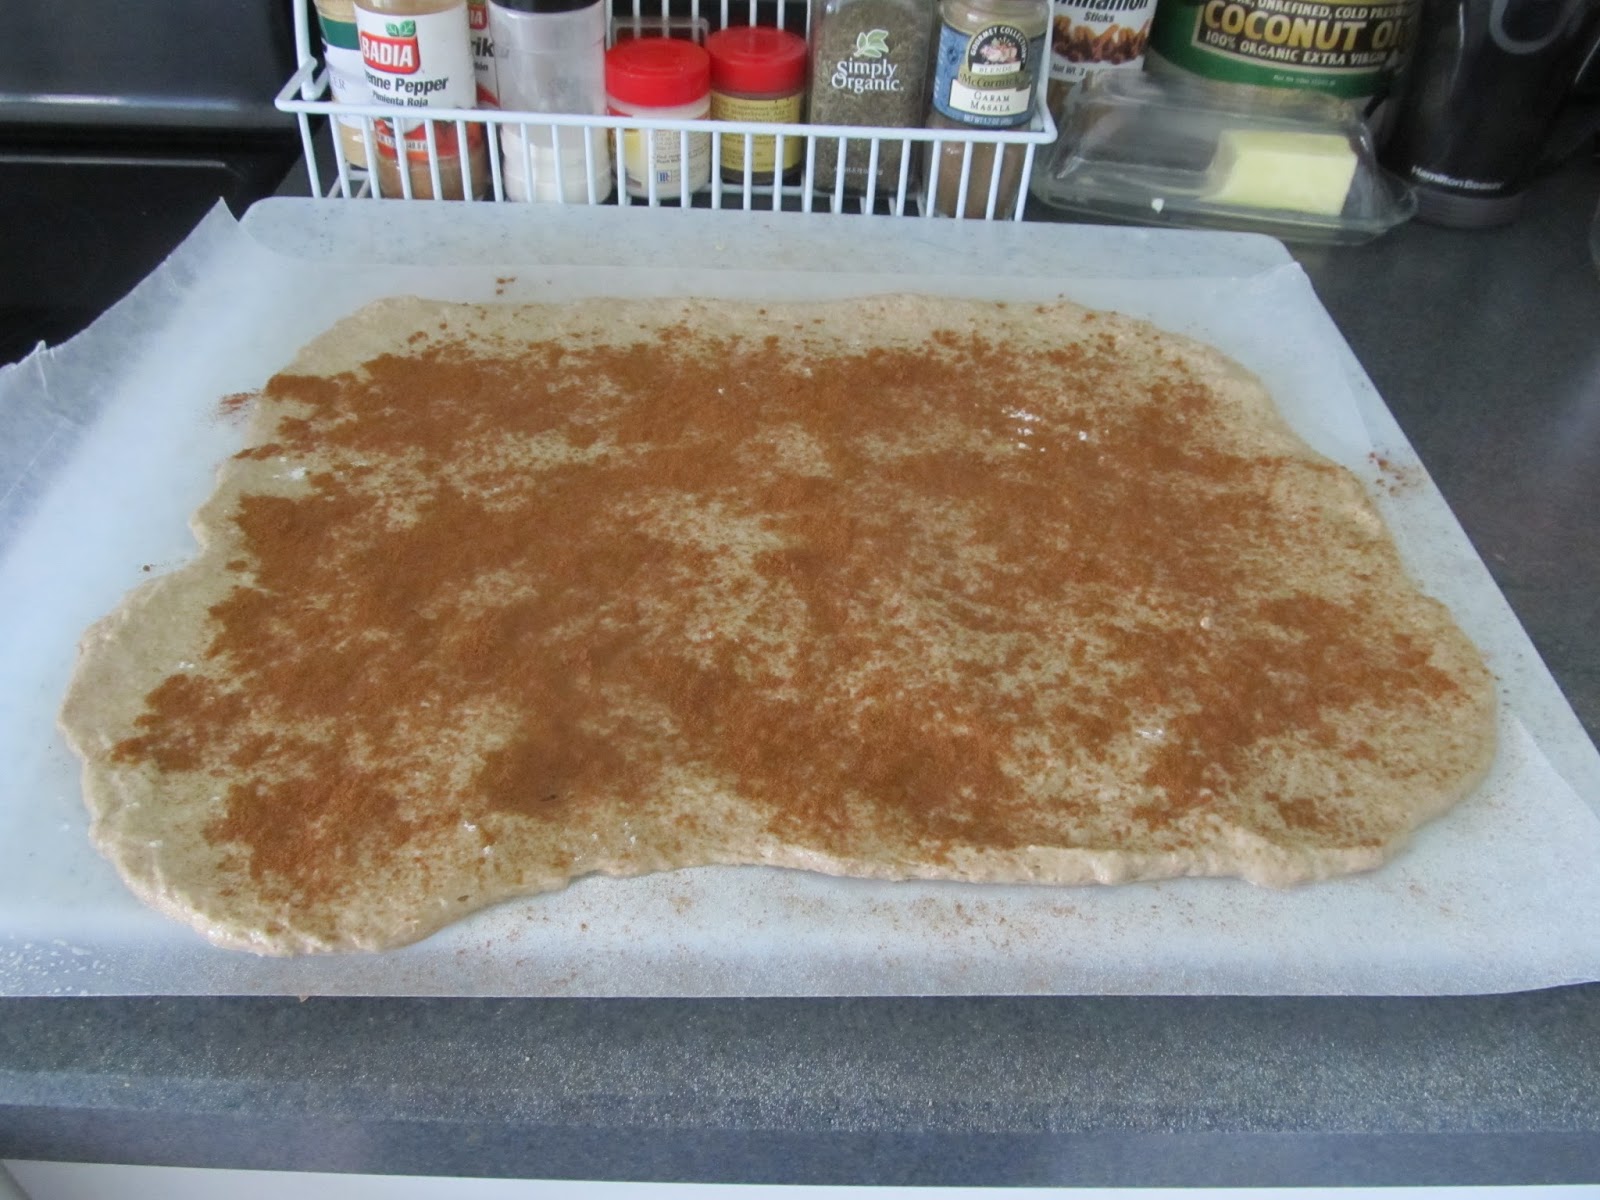
(Next week I plan to share an awesome way to make Cinnamon Rolls using this recipe, so stay tuned for next week's recipe.)
This jar is 4 days old dough, notice that it has sunken a little bit

All the dough from the glass jar split between two 2lb loaf tins

90 minutes later and ready to bake

Fresh out of the oven

Nice fluffy homemade rye bread

 This post is linked up on Stacy Makes Cents for Trim Healthy Tuesday

For more information about Trim Healthy Mama visit the website here.

Tuesday, August 13, 2013

Trim Healthy Mama Tuesday - Key Lime Cheesecake

In celebration of my birthday today I made cheesecake at the weekend. Although there is a recipe for cheesecake in the book I thought I would try my hand at THMing a wonderful cheesecake recipe I already had, and knew worked really well.

I did make two different flavors, but the chocolate one isn't going to be tasted until tonight, so I'll post a recipe for that one separately at a later date (and I didn't take photos of the chocolate one as I went through making it.)

Key Lime Cheesecake (most definitely an S)

For the crust I chopped some Pecans and stirred in 2oz of butter. I then pressed the pecans into a 9inch spring form pan and baked at 350f for 10 minutes


1lb cream cheese, at room temperature

1 teaspoon of pure Stevia extract powder (I used KAL brand)

2 teaspoon vanilla

1/4 cup Greek Yogurt

1/4 cup heavy/whipping cream

3 tablespoons of Almond flour

4 eggs, at room temperature

1/2 lb Key Limes, juice & zest

Combine cream cheese, stevia and vanilla.

Add yogurt & cream, beat slowly just until smooth.

Mix in almond flour.

Add eggs one at a time, beating in between each egg.

Beat in Key Lime juice & zest.

DO NOT OVER BEAT as it will make the cheesecake sink in the middle.

Pour cheesecake mixture onto the crust.

Place in the center of middle oven rack, with a pan of water on the lower rack.

Bake at 350f for 15 minutes, then lower the temperature to 300f for 70 minutes.

Turn oven off, but let the cheesecake stand in the oven with the door slightly open for 30 minutes.

Completely cool on a wire rack.

Refrigerate for 12-24 hours before serving.


Enjoy

 
This post is being linked up over at Stacy Makes Cents for Trim Healthy Tuesday. Check out the link up for more ideas and recipes from Trim Healthy Mamas.

For more information about the Trim Healthy Mama eating plan visit the website here.

Tuesday, August 6, 2013

Trim Healthy Mama Tuesday - Quick Lunch Size Pizza

Just a quick post today with one of my new favorite lunches.

You will need:

1 Joseph's Lavash Bread

 
2-3 tablespoons of crushed tomatoes
shredded low fat mozzarella cheese
half a skinless chicken breast, cooked and shredded

preheat the oven to 425f (240c or Gas mark 7)

Place the Lavash bread on a greased baking sheet (I used a piece of parchment paper to make it easier to remove after baking.)

Spread the crushed tomatoes over the Lavash bread.

Add the chicken and cheese, spreading evenly over the whole bread.


Bake in the oven for 8-10 minutes.

Cut into 6 pieces and split with someone else. 

A big green salad goes really well with this.

If you only add a small amount of cheese this will stay in Fuel Pull territory, so could be served with either a S or an E salad/dressing.

Enjoy

This recipe is being linked up on a Trim Healthy Tuesday link up over at Stacy Makes Cents.

For more information on Trim Healthy Mama check out their website here.